Tuesday, May 14, 2013

A cute but impractical refashion


I've had a full plate recently and I haven't mustered up the will to start a sewing project from scratch. I needed something quick and rewarding, so I thought I would do a simple refashion.

red floral vintage skirt

I bought this blouse at a thrift store and was going to wear it in it's original state. When I tried it on again at home I realized that it would be way too uncomfortable as a blouse. It's a stiff thick cotton and ever so slightly scratchy. I should have foreseen it's comfort level at the time of purchase, but I fell in love with the print and there's only so much time you can ponder things when you bring your 16 month old kid along.


I just chopped it where the yoke meets the the body of the blouse. I cut 2 inch strips for the waist band, using part of one sleeve and part of the upper back. I re-purposed the top snap set on the blouse for the top closure on the waist band. I just cut squares around them, pressed in the raw edges and sewed them to the ends of the waistband. It was a pretty quick project. The most time consuming part was hand sewing the waistband on the inside to enclose the raw edges. 


I think it turned out super cute. I thinks it's flattering for my figure. It makes my short legs look longer and it hides my squishy lower tummy. 

sewing skirt


 Unfortunately, the length is not very practical for me. I don't have very many opportunities to wear tights, either, so I'm not sure I'll actually wear it. I am seriously thinking about making a red culotte slip for it though, in order to make it more wearable. 


Even though I doubt I'll wear it, I really enjoyed this project. I like the limited parameters refashioning can provide. I tend to over-think things and refashioning allows me to focus and not get lost in endless options. What about you? Have you ever refashioned something? Do you like it as much as projects started from scratch?

Sunday, April 28, 2013

Brassieres Away!

All my nursing bras went kaput at the same time. Unfortunately (or fortunately) I made the Seamless Pledge for 2013, so I had to either buy bras at a thrift store or make them myself. While scrounging around for bras at thrift stores in my size and then altering them for nursing access sounds like a blast, I opted to make them myself. This is something I wouldn't have fathomed doing myself before I got into reading sewing blogs. After seeing so many women crafting gorgeous bras, I couldn't resist, especially after wearing the following for the past 16 months:


Bravado Nursing Bra


It is probably the most comfortable bra in the world. It also happens to be one of the ugliest. I'm glad to move on to sexier pastures. Until next baby, dear ugly friend.

That is why I purchased a pattern and a bra/panty kit from Merkwaerdigh on Etsy. Her designs are really pretty and varied and she has cute kits for a decent price. I chose the BHS10 pattern because it came with 5 different bra options and I was loving the racer back style and the lace look. 


Merkwaerdigh lingerie
BHS10 Merkwaerdigh


I chose view C. It's a wireless soft bra with lace panels. Combined with the stretchy lyrca fabric from my kit, it is not the sturdiest, but it's great for lounging around the house and yard or sleeping in. I scavenged the nursing clasps from a now retired bra. I went rogue on the straps and fashioned them so they could be adjustable and also accommodate the nursing clasps. The straps seemed pretty flimsy in the finished product, so I scavenged the straps from another bra, trimmed it with picot elastic and sewed it under a portion of the existing strap. It made it a lot more supportive and comfortable. 


purple lace bra
Wish I had a dress form to show the shape better.

 bra diy


In hindsight I probably would have chosen a different pattern for my first bra sewing effort. The instructions are not great for a beginner bra sewer and I was at the larger limit of their cup size.  My rtw nursing bras come in small/med/large/extra large, so I wasn't sure what my rtw cup size was post pregnancy. After trying on some rtw bras at the store, I found that I was 34D (I previously wore a 36 B). I was not expecting that. Fortunately the fabric I received in my kit had generous stretch, so the fit worked out in the end. I did a few toiles with less stretch and they were a tad small. 


sewing lingerie
Looks much prettier against the light.


Here's the part I'm most excited about: I combined sizes and did a 34D for my left side and a 36D for my right side. Yup, my breasts are different sizes. It didn't even cross my mind that I could combine sizes when I decided to make my own bras. I had the epiphany when I was trying on the toile. With most rtw bras, if my right breast fits perfectly into the cup, the left side will gape and if my left breast fist perfectly, my right side is smushed and bulging out of the cup.  Ladies, if you have different sized breasts and you own a sewing machine, I would encourage you to start making your own bras! This has been a life changing sewing project for me!

 Now that I think of it, I guess you could buy two rtw bras in different sizes, cut them in half and sew the different sizes together. . . but bras are expensive, yo. Unless you could find someone with the same problem who's the same size, except mirror image to you and split the cost. Joking, joking.


Love the lycra print, but not sure I like it paired with that shade of purple. Too contrasty. 


My new bra has some questionable sewing going on. . . a few wonky stitches, tension problem areas, badly done decorative straps, and a a big pucker by the closure area. I also didn't attach the upper cup lining to the lace. I thought I'd share that to "keep it real", as it's easy to hide shoddy work in photographs. I also want to keep track of how I'm improving in my sewing skills.


I need a sturdier bra, so I'll be searching for patterns to accommodate that. I also need to sit down and really dig into some bra making tutorials. Anyone else thinking about making their own bras?


Thursday, April 4, 2013

Simplicity Sew Simple A1634

I don't like how these shorts turned out. I wanted them to be in a bright loud "ethnic" print and I wanted them to be flowy. I couldn't find both factors for the equation off hand, so I opted for the print instead of the flow. I made them in a cotton batik that is light-med weight.


They don't hang the way I want them to and I don't like the way they wrinkle. I also probably should have made the legs a little wider and lengthened the crotch for the look I was going for.

yellow_pleated_shorts


I do think this pattern has potential. I like the tie, the pockets and even the pleats. If I find some challis in a print that speaks to me, I may sew these up again with a few tweaks.


If high school me knew I was sewing up shorts with a mid rise, pleats and elastic waist, she would be mortified. I would tell her to treat herself better by not wearing so many polyester shirts.

sew_simple_shorts


Tuesday, April 2, 2013

Burdastyle- Ruby Shorts #6005


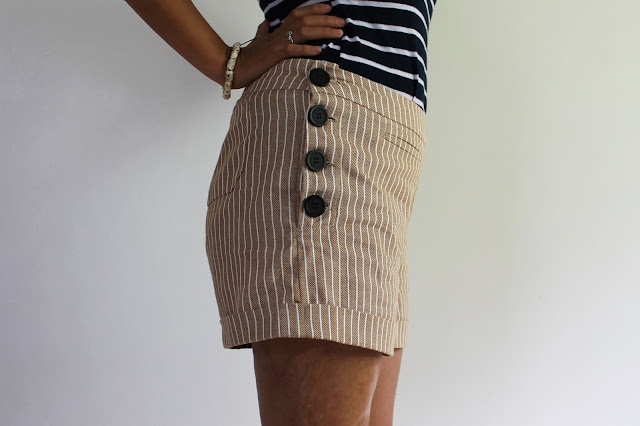
These shorts mark 3 firsts for me. First time making a muslin, first time doing a double welt pocket and the first time doing a rolled cuff hem. I'm not really a shorts person, but hot and humid weather has me going for it.

tan striped high waisted shorts

I decided on Ruby #6005 from Burdastyle as there were plenty of real life examples posted on their site from members and I liked what I saw. I liked that the rise was fairly high and the button detail was pretty cute.

summer shorts pattern
Ruby #6005 Burdastyle

I decided to cut a size 42 for my muslin which was a size larger than I thought I would need. My muslin confirmed that I probably needed to go down a size and I went with a 40 for my final version. If my fabric had stretch to it, I may have tried a 38.


My first muslin! Trial and error with the double welt pockets

 I decided to forgo the back pocket flap and belt and made two pockets in back instead of one. I also added an inch or so to the length of the crotch depth. I only sewed button holes for one side and just sewed the buttons over both plackets on the other side to save on some time, since I won't need to unbutton both sides to get in and out of them.


I used the same fabric for both the muslin and the final piece which came from my mom's old stash. I was originally convinced that it was polyester, but a burn test revealed it to be cotton(?) so I decided to go ahead and use it for my finished product. It is slightly scratchy, but nothing I can't live with for now, since I'm mainly concerned with breath-ability.


Overall I'm pretty happy with the fit, but think it would look better if the back pockets were slightly larger and lowered a little. I may fix that later, but I'm calling it good for now. Also, there are also some drag lines in the back. I'm assuming it's because that region of my derriere is a little concave? not sure how I would fix this.


I tried hard to take my time with these and not rush the process. They are far from perfect, but I'm proud of my results!


Sucking in my gut!


 I think I'm most likely to wear them with a loose, un-tucked blouse. Right now I don't really have any tops to match these with. I usually choose patterns over solids for my tops to hide stains, but I think I'll have to sew up a few solids for a more versatile wardrobe.


I've already sewn another pair of shorts in a different pattern that I'll be posting shortly. Haha. They are pretty wild. Until next time. . .

Saturday, March 23, 2013

Pajama time

I've been wanting some official pajamas to make me feel like less of a slob. Normally I wear a tshirt and my man's basketball shorts. Paired with my short hair and short stature, I feel like a 12 year old boy. I've made two pairs so far.


 I was planning on taking photos of the first pair, but I can't seem to find them. *scratches head* They turned out alright, but pretty sloppy. I made them out of a certain lost and found skirt that had a huge rip in it. It hadn't been found in a while, so I swiped it. I did manage to get a photo of it before I cut into it.

You'll have to imagine this in a tank and shorts set.
 I managed to get a big swirl over each butt cheek, cinnamon bun style.

When I went to cut it up, I realized it was home sewn. It look like it was originally a home sewn dress, that had been chopped into the skirt. Whoever made it into a skirt was super lazy. They left the seam allowance raw and sticking out and it varied in allowance by 5/8" to 3". The elastic was tied instead of sewn, they didn't close the elastic casing all the way, and the top stitching was a pink metallic while the bobbin thread was white. It sounds like something I would have done in high school, but now that I'm grown up and all, I obviously have higher standards. *nods*  I made the top with Grainline's Tiny Pocket Tank and the bottoms were curved hem athletic shorts (is there an official name for this?) from an old McCall's pattern. The instructions missing for the shorts, which I needed for the curved and bound hem. I thought they were supposed to be piped, but half way realized they needed to be bound. I also wasn't sure how to attach the side seams and they came out pretty bad. They were also too big.


Second time around I used some poly blend? twill? from my mom's stash. It actually feels a little satin-y. This fabric has been in my mom's linen closet for a long time and I remember seeing it there all through my childhood and thinking how ugly it was. Now I'm wearing it! Yahoo!


The top is from McCall's 6519 in size 10. It ended up being too small, especially around the hip and stomach, so I slit and bound the sides. I cut a size 12 for the shorts in the first pair, but went down to a 10 this time around, and now they fit how I like them. At first I thought that maybe I should have curved them hem at the sides of the top to mimic the shorts, but I saw that with both of them together, the binding makes it look like an arrow. I love it! I hereby call this pajama set "my arrow pjs"

These photos are pretty much straight out of bed, sans make up, avec bedhead.

See the arrow? Awwww, yeeeeaaah!


Tucked in, romper style!


I love having something a little more put together to go to bed and wake up in.

I think next set I'll go for something a little more romantic. Just need to find the right pattern.

Thursday, March 21, 2013

The tanks that started the obsession.

When I made these tank tops, a light turned on in my head and I knew I wanted to sew my own clothes. After months of wearing knit tees that clung to my muffin top and failed attempts at shopping for new clothes, these  felt amazing.  I love the way they fall away from the body, which is great for the heat and humidity of where I live. I also think they are pretty dang versatile. Tucked in. . . left out. . . belted . . . under a cardigan. . . there are a lot of options to play with. These tanks have seen a lot of use since I sewed them up in January. They are Tiny Pocket Tanks (sans pockets) from Grainline patterns.

This blue floral is from my mom's old fabric stash. She has a lot of fabric from the 70s and 80s. Most of it is in bad shape and a lot of it is gross polyester, but there are a few decent things in there. It's a little too tight in the upper bust area. At first I didn't care for the print, but it has grown on me. 


blue floral woven tank top


This next tank was re-purposed from a rayon maxi dress that was too small for me. I'm pretty sure it's rayon challis. I'm not very knowledgeable about different types of fabrics yet, so I'm guessing it's challis from what I've read about challis. It stretched a bit after cutting and I had to create an impromptu pleat in the front to keep it matching with the bias tape. A bit of the seam allowance frayed out of the neckline binding in the back. Grrr. Should I try to keep it in check with super glue? I'm not ready to give this tank up.


lilac rayon challis tank top


I've sewn up another tank to use in a pajama set, which I'll post soon. I underestimated the effort it would take to get photos of finished projects. Um, modeling is totally harder than I thought it would be. Mad respect for professional models, ya'll.


Wednesday, March 6, 2013

So I entered a contest. . .

I couldn't help myself and entered a remix challenge over at Project Run and Play. I thought it would be fun! Turns out it wasn't. I don't think I should try to take on challenges a day before the deadline. I thought I had another day to complete it, but nope. There was a lot of seam ripping and cut corners. *Shrugs shoulders*

The challenge was to remix Me Sew Crazy's "Spring Fever Dress".

When I saw the bib detail I thought of a tulip, which is pretty much Spring's official flower, I think. Perfect!

I applied bleach to the top edges of the tulip to lighten it. I did some hand sewn top stitching around the edges of the bodice with embroidery floss.


The top tier of the bubble skirt is in a mock-wrap, with the stem of the tulip running along it's edge.


I used the same slit opening as the original Spring Fever Dress, put fastened it with a snap at the top, creating a peek-a-boo effect.


I'm pleased with the overall design, but I wish I would have had more time to make a really polished product. I think it would be cool to try out different flowers for the bib detail.

In any case, my girly has an Easter dress! I'm almost glad I didn't have more time to finish it, she will likely stain it in 5 seconds. White isn't a terribly practical fabric to put on a toddler.